这篇文章,起源于想玩一下 BAE。可是,全网搜索,仅仅找到各种高手已经定制好的版本,却没有比较完善的教大家修改的教程(有,但都不完善)。所以,自己下载各种所谓的BAE定制版进行代码对比,去其糟粕,取其精华,舍去那些添加的让人感到不顺眼的东西,做成了这个教程。
其实 BAE 不如 SAE 那样对函数有严格的限制,所以不需要动太多核心代码即可搞掂。所以,大家不必担心教程过于难,大胆动手尝试!
首先,在 BAE 新建一个 PC Ifame 应用,正确建好数据库,建好云存储 BUCKET,建好消息服务(单模式/多模式均可)这些不用我教了吧?
并且,学会用 SVN/GIT 上传代码,这个自己看 BAE 帮助手册,毕竟我不是教大家如何在 BAE 搭建 WordPress,而是教大家如何定制 WordPress BAE 版。
然后,下载一个最新版的 WordPress 下来,这个自己百度。(本教程基于目前最新版 WordPress 3.6.1)
好了,一步步开始动工!
第一步:修改 WP-Config.php
新建一个文件,命名为 wp-config.php,或者直接将 wp-config-sample.php 重命名为 wp-config.php。
然后,写入以下代码:
<?php
/**
* WordPress 基础配置文件。
*
* 本文件包含以下配置选项:MySQL 设置、数据库表名前缀、密钥、
* WordPress 语言设定以及 ABSPATH。如需更多信息,请访问
* {@link http://codex.wordpress.org/zh-cn:%E7%BC%96%E8%BE%91_wp-config.php
* 编辑 wp-config.php} Codex 页面。MySQL 设置具体信息请咨询您的空间提供商。
*
* 这个文件用在于安装程序自动生成 wp-config.php 配置文件,
* 您可以手动复制这个文件,并重命名为“wp-config.php”,然后输入相关信息。
*
* @package WordPress
*/
// ** MySQL 设置 - 具体信息来自您正在使用的主机 ** //
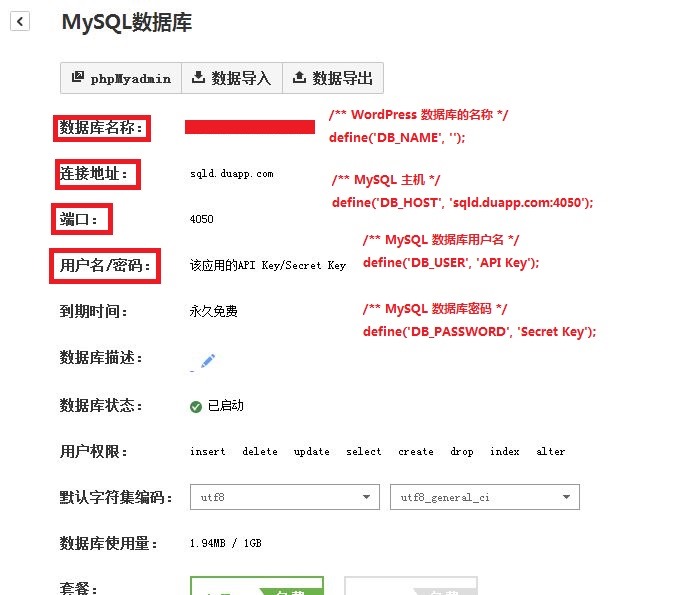
/** WordPress 数据库的名称 */
define('DB_NAME', 'database_name_here');
/** MySQL 数据库用户名 */
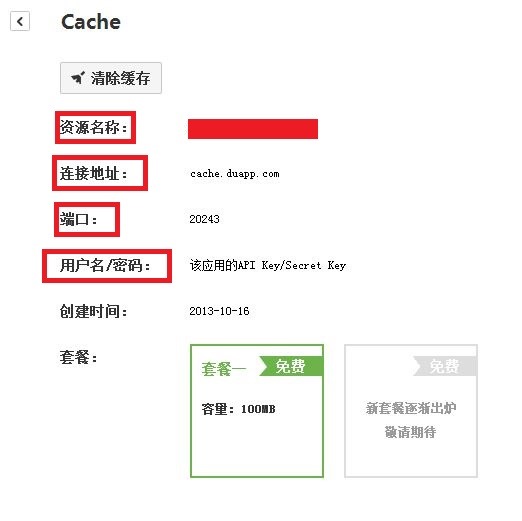
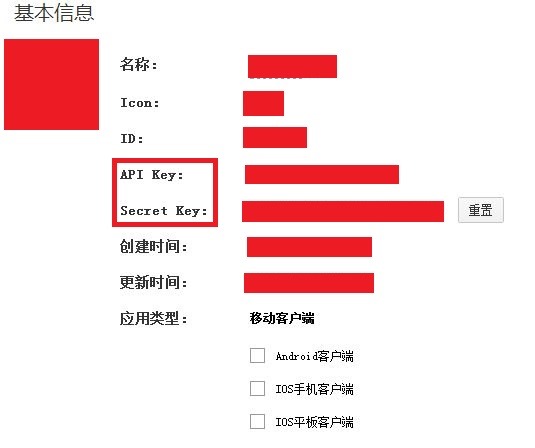
define('DB_USER', getenv('HTTP_BAE_ENV_AK'));
/** MySQL 数据库密码 */
define('DB_PASSWORD', getenv('HTTP_BAE_ENV_SK'));
/** MySQL 主机 */
define('DB_HOST', getenv('HTTP_BAE_ENV_ADDR_SQL_IP') . ":" . getenv('HTTP_BAE_ENV_ADDR_SQL_PORT'));
/** 创建数据表时默认的文字编码 */
define('DB_CHARSET', 'utf8');
/** 数据库整理类型。如不确定请勿更改 */
define('DB_COLLATE', '');
/** BCMS 消息队列的名称 */
define('BCMS_QUEUE', 'bcms_queue_here');
/**#@+
* 身份认证密匙设定。
*
* 您可以随意写一些字符
* 或者直接访问 {@link https://api.wordpress.org/secret-key/1.1/salt/ WordPress.org 私钥生成服务},
* 任何修改都会导致 cookie 失效,所有用户必须重新登录。
*
* @since 2.6.0
*/
define('AUTH_KEY', 'put your unique phrase here');
define('SECURE_AUTH_KEY', 'put your unique phrase here');
define('LOGGED_IN_KEY', 'put your unique phrase here');
define('NONCE_KEY', 'put your unique phrase here');
define('AUTH_SALT', 'put your unique phrase here');
define('SECURE_AUTH_SALT', 'put your unique phrase here');
define('LOGGED_IN_SALT', 'put your unique phrase here');
define('NONCE_SALT', 'put your unique phrase here');
/**#@-*/
/**
* WordPress 数据表前缀。
*
* 如果您有在同一数据库内安装多个 WordPress 的需求,请为每个 WordPress 设置不同的数据表前缀。
* 前缀名只能为数字、字母加下划线。
*/
$table_prefix = 'wp_';
/**
* WordPress 语言设置,中文版本默认为中文。
*
* 本项设定能够让 WordPress 显示您需要的语言。
* wp-content/languages 内应放置同名的 .mo 语言文件。
* 要使用 WordPress 简体中文界面,只需填入 zh_CN。
*/
define('WPLANG', 'zh_CN');
/**
* 开发者专用:WordPress 调试模式。
*
* 将这个值改为“true”,WordPress 将显示所有用于开发的提示。
* 强烈建议插件开发者在开发环境中启用本功能。
*/
define('WP_DEBUG', false);
/**
* WordPress 多站点模式。
*
* 将这个值改为“true”,WordPress 将启用多站点模式。
*/
define('WP_ALLOW_MULTISITE', false);
/* 好了!请不要再继续编辑。请保存本文件。使用愉快! */
/** WordPress 目录的绝对路径。 */
if ( !defined('ABSPATH') )
define('ABSPATH', dirname(__FILE__) . '/');
/** 设置 WordPress 变量和包含文件。 */
require_once(ABSPATH . 'wp-settings.php');
照着里面的中文注释,把相应数据填入。身份密匙的生成,在注释中也有详细的说明,照办即可。
第二步:修改 wp-admin\includes\file.php
在约第 330 行,查找
// Move the file to the uploads dir
$new_file = $uploads['path'] . "/$filename";
替换为
// Fix By BAE
$hiPath = sys_get_temp_dir();
$new_file = $uploads['path'] . "/$filename";
第三步:修改 wp-includes\wp-db.php
在约 1163 行,查找
$this->set_charset( $this->dbh );
$this->ready = true;
$this->select( $this->dbname, $this->dbh );
替换为
//Fix By BAE
$this->ready = true;
$this->select( $this->dbname, $this->dbh );
$this->set_charset( $this->dbh );
第四步:修改 wp-includes\pluggable.php
在约 177 行,查找
if ( !function_exists( 'wp_mail' ) ) :
/**
 * Send mail, similar to PHP's mail
 *
 * A true return value does not automatically mean that the user received the
 * email successfully. It just only means that the method used was able to
 * process the request without any errors.
 *
 * Using the two 'wp_mail_from' and 'wp_mail_from_name' hooks allow from
 * creating a from address like 'Name <email@address.com>' when both are set. If
 * just 'wp_mail_from' is set, then just the email address will be used with no
 * name.
 *
 * The default content type is 'text/plain' which does not allow using HTML.
 * However, you can set the content type of the email by using the
 * 'wp_mail_content_type' filter.
 *
 * The default charset is based on the charset used on the blog. The charset can
 * be set using the 'wp_mail_charset' filter.
 *
 * @since 1.2.1
 * @uses apply_filters() Calls 'wp_mail' hook on an array of all of the parameters.
 * @uses apply_filters() Calls 'wp_mail_from' hook to get the from email address.
 * @uses apply_filters() Calls 'wp_mail_from_name' hook to get the from address name.
 * @uses apply_filters() Calls 'wp_mail_content_type' hook to get the email content type.
 * @uses apply_filters() Calls 'wp_mail_charset' hook to get the email charset
 * @uses do_action_ref_array() Calls 'phpmailer_init' hook on the reference to
 *		phpmailer object.
 * @uses PHPMailer
 *
 * @param string|array $to Array or comma-separated list of email addresses to send message.
 * @param string $subject Email subject
 * @param string $message Message contents
 * @param string|array $headers Optional. Additional headers.
 * @param string|array $attachments Optional. Files to attach.
 * @return bool Whether the email contents were sent successfully.
 */
function wp_mail( $to, $subject, $message, $headers = '', $attachments = array() ) {
	// Compact the input, apply the filters, and extract them back out
	extract( apply_filters( 'wp_mail', compact( 'to', 'subject', 'message', 'headers', 'attachments' ) ) );

	if ( !is_array($attachments) )
		$attachments = explode( "\n", str_replace( "\r\n", "\n", $attachments ) );

	global $phpmailer;

	// (Re)create it, if it's gone missing
	if ( !is_object( $phpmailer ) || !is_a( $phpmailer, 'PHPMailer' ) ) {
		require_once ABSPATH . WPINC . '/class-phpmailer.php';
		require_once ABSPATH . WPINC . '/class-smtp.php';
		$phpmailer = new PHPMailer( true );
	}

	// Headers
	if ( empty( $headers ) ) {
		$headers = array();
	} else {
		if ( !is_array( $headers ) ) {
			// Explode the headers out, so this function can take both
			// string headers and an array of headers.
			$tempheaders = explode( "\n", str_replace( "\r\n", "\n", $headers ) );
		} else {
			$tempheaders = $headers;
		}
		$headers = array();
		$cc = array();
		$bcc = array();

		// If it's actually got contents
		if ( !empty( $tempheaders ) ) {
			// Iterate through the raw headers
			foreach ( (array) $tempheaders as $header ) {
				if ( strpos($header, ':') === false ) {
					if ( false !== stripos( $header, 'boundary=' ) ) {
						$parts = preg_split('/boundary=/i', trim( $header ) );
						$boundary = trim( str_replace( array( "'", '"' ), '', $parts[1] ) );
					}
					continue;
				}
				// Explode them out
				list( $name, $content ) = explode( ':', trim( $header ), 2 );

				// Cleanup crew
				$name    = trim( $name    );
				$content = trim( $content );

				switch ( strtolower( $name ) ) {
					// Mainly for legacy -- process a From: header if it's there
					case 'from':
						if ( strpos($content, '<' ) !== false ) {
							// So... making my life hard again?
							$from_name = substr( $content, 0, strpos( $content, '<' ) - 1 );
							$from_name = str_replace( '"', '', $from_name );
							$from_name = trim( $from_name );

							$from_email = substr( $content, strpos( $content, '<' ) + 1 );
							$from_email = str_replace( '>', '', $from_email );
							$from_email = trim( $from_email );
						} else {
							$from_email = trim( $content );
						}
						break;
					case 'content-type':
						if ( strpos( $content, ';' ) !== false ) {
							list( $type, $charset ) = explode( ';', $content );
							$content_type = trim( $type );
							if ( false !== stripos( $charset, 'charset=' ) ) {
								$charset = trim( str_replace( array( 'charset=', '"' ), '', $charset ) );
							} elseif ( false !== stripos( $charset, 'boundary=' ) ) {
								$boundary = trim( str_replace( array( 'BOUNDARY=', 'boundary=', '"' ), '', $charset ) );
								$charset = '';
							}
						} else {
							$content_type = trim( $content );
						}
						break;
					case 'cc':
						$cc = array_merge( (array) $cc, explode( ',', $content ) );
						break;
					case 'bcc':
						$bcc = array_merge( (array) $bcc, explode( ',', $content ) );
						break;
					default:
						// Add it to our grand headers array
						$headers[trim( $name )] = trim( $content );
						break;
				}
			}
		}
	}

	// Empty out the values that may be set
	$phpmailer->ClearAddresses();
	$phpmailer->ClearAllRecipients();
	$phpmailer->ClearAttachments();
	$phpmailer->ClearBCCs();
	$phpmailer->ClearCCs();
	$phpmailer->ClearCustomHeaders();
	$phpmailer->ClearReplyTos();

	// From email and name
	// If we don't have a name from the input headers
	if ( !isset( $from_name ) )
		$from_name = 'WordPress';

	/* If we don't have an email from the input headers default to wordpress@$sitename
	 * Some hosts will block outgoing mail from this address if it doesn't exist but
	 * there's no easy alternative. Defaulting to admin_email might appear to be another
	 * option but some hosts may refuse to relay mail from an unknown domain. See
	 * http://trac.wordpress.org/ticket/5007.
	 */

	if ( !isset( $from_email ) ) {
		// Get the site domain and get rid of www.
		$sitename = strtolower( $_SERVER['SERVER_NAME'] );
		if ( substr( $sitename, 0, 4 ) == 'www.' ) {
			$sitename = substr( $sitename, 4 );
		}

		$from_email = 'wordpress@' . $sitename;
	}

	// Plugin authors can override the potentially troublesome default
	$phpmailer->From     = apply_filters( 'wp_mail_from'     , $from_email );
	$phpmailer->FromName = apply_filters( 'wp_mail_from_name', $from_name  );

	// Set destination addresses
	if ( !is_array( $to ) )
		$to = explode( ',', $to );

	foreach ( (array) $to as $recipient ) {
		try {
			// Break $recipient into name and address parts if in the format "Foo <bar@baz.com>"
			$recipient_name = '';
			if( preg_match( '/(.*)<(.+)>/', $recipient, $matches ) ) {
				if ( count( $matches ) == 3 ) {
					$recipient_name = $matches[1];
					$recipient = $matches[2];
				}
			}
			$phpmailer->AddAddress( $recipient, $recipient_name);
		} catch ( phpmailerException $e ) {
			continue;
		}
	}

	// Set mail's subject and body
	$phpmailer->Subject = $subject;
	$phpmailer->Body    = $message;

	// Add any CC and BCC recipients
	if ( !empty( $cc ) ) {
		foreach ( (array) $cc as $recipient ) {
			try {
				// Break $recipient into name and address parts if in the format "Foo <bar@baz.com>"
				$recipient_name = '';
				if( preg_match( '/(.*)<(.+)>/', $recipient, $matches ) ) {
					if ( count( $matches ) == 3 ) {
						$recipient_name = $matches[1];
						$recipient = $matches[2];
					}
				}
				$phpmailer->AddCc( $recipient, $recipient_name );
			} catch ( phpmailerException $e ) {
				continue;
			}
		}
	}

	if ( !empty( $bcc ) ) {
		foreach ( (array) $bcc as $recipient) {
			try {
				// Break $recipient into name and address parts if in the format "Foo <bar@baz.com>"
				$recipient_name = '';
				if( preg_match( '/(.*)<(.+)>/', $recipient, $matches ) ) {
					if ( count( $matches ) == 3 ) {
						$recipient_name = $matches[1];
						$recipient = $matches[2];
					}
				}
				$phpmailer->AddBcc( $recipient, $recipient_name );
			} catch ( phpmailerException $e ) {
				continue;
			}
		}
	}

	// Set to use PHP's mail()
	$phpmailer->IsMail();

	// Set Content-Type and charset
	// If we don't have a content-type from the input headers
	if ( !isset( $content_type ) )
		$content_type = 'text/plain';

	$content_type = apply_filters( 'wp_mail_content_type', $content_type );

	$phpmailer->ContentType = $content_type;

	// Set whether it's plaintext, depending on $content_type
	if ( 'text/html' == $content_type )
		$phpmailer->IsHTML( true );

	// If we don't have a charset from the input headers
	if ( !isset( $charset ) )
		$charset = get_bloginfo( 'charset' );

	// Set the content-type and charset
	$phpmailer->CharSet = apply_filters( 'wp_mail_charset', $charset );

	// Set custom headers
	if ( !empty( $headers ) ) {
		foreach( (array) $headers as $name => $content ) {
			$phpmailer->AddCustomHeader( sprintf( '%1$s: %2$s', $name, $content ) );
		}

		if ( false !== stripos( $content_type, 'multipart' ) && ! empty($boundary) )
			$phpmailer->AddCustomHeader( sprintf( "Content-Type: %s;\n\t boundary=\"%s\"", $content_type, $boundary ) );
	}

	if ( !empty( $attachments ) ) {
		foreach ( $attachments as $attachment ) {
			try {
				$phpmailer->AddAttachment($attachment);
			} catch ( phpmailerException $e ) {
				continue;
			}
		}
	}

	do_action_ref_array( 'phpmailer_init', array( &$phpmailer ) );

	// Send!
	try {
		return $phpmailer->Send();
	} catch ( phpmailerException $e ) {
		return false;
	}
}
endif;
替换为
if ( !function_exists( 'wp_mail' ) ) :
/**
 * Send Mail
 * BCMS
 */
function wp_mail( $to, $subject, $message, $headers = '', $attachments = array() ) {
	// Headers
	if ( empty( $headers ) ) {
		$headers = array();
	} else {
		if ( !is_array( $headers ) ) {
			// Explode the headers out, so this function can take both
			// string headers and an array of headers.
			$tempheaders = explode( "\n", str_replace( "\r\n", "\n", $headers ) );
		} else {
			$tempheaders = $headers;
		}
		$headers = array();

		// If it's actually got contents
		if ( !empty( $tempheaders ) ) {
			// Iterate through the raw headers
			foreach ( (array) $tempheaders as $header ) {
				// Explode them out
				list( $name, $content ) = explode( ':', trim( $header ), 2 );

				// Cleanup crew
				$name = trim( $name	);
				$content = trim( $content );

				switch ( strtolower( $name ) ) {
					// Mainly for legacy -- process a From: header if it's there
					case 'from':
						if ( strpos($content, '<' ) !== false ) {
							// So... making my life hard again?
							$from_name = substr( $content, 0, strpos( $content, '<' ) - 1 );
							$from_name = str_replace( '"', '', $from_name );
							$from_name = trim( $from_name );

							$from_email = substr( $content, strpos( $content, '<' ) + 1 );
							$from_email = str_replace( '>', '', $from_email );
							$from_email = trim( $from_email );
						} else {
							$from_email = trim( $content );
						}
						break;
					case 'content-type':
						if ( strpos( $content, ';' ) !== false ) {
							list( $type, $charset ) = explode( ';', $content );
							$content_type = trim( $type );
						} else {
							$content_type = trim( $content );
						}
						break;

				}
			}
		}
	}

	/* If we don't have an email from the input headers default to wordpress@$sitename
	 * Some hosts will block outgoing mail from this address if it doesn't exist but
	 * there's no easy alternative. Defaulting to admin_email might appear to be another
	 * option but some hosts may refuse to relay mail from an unknown domain. See
	 * http://trac.wordpress.org/ticket/5007.
	 */

	if ( !isset( $from_email ) ) {
		// Get the site domain and get rid of www.
		$sitename = strtolower( $_SERVER['SERVER_NAME'] );
		if ( substr( $sitename, 0, 4 ) == 'www.' ) {
			$sitename = substr( $sitename, 4 );
		}

		$from_email = 'no-reply@' . $sitename;
	}

	// Set Content-Type and charset
	// If we don't have a content-type from the input headers
	if ( !isset( $content_type ) )
		$content_type = 'text/plain';

	$content_type = apply_filters( 'wp_mail_content_type', $content_type );
	if($content_type == 'text/html') {
		$header = "<!--HTML-->";
	}

	// 重复引用,BaeException就是这里报的
	// require_once ABSPATH . WPINC . '/Bcms.class.php';
	$bcms = new Bcms () ;

	// 利用bcms发信
	$ret = $bcms->mail ( BCMS_QUEUE, $header.$message, array($to), array( Bcms::FROM=>$from_email ,Bcms::MAIL_SUBJECT => $subject)) ;

	// 返回值
	if ( false === $ret ) {
		return false;
	} else {
		return true;
	}
}
endif;

if ( !function_exists( 'wp_mail' ) ) :
/**
 * Send mail, similar to PHP's mail
 *
 * A true return value does not automatically mean that the user received the
 * email successfully. It just only means that the method used was able to
 * process the request without any errors.
 *
 * Using the two 'wp_mail_from' and 'wp_mail_from_name' hooks allow from
 * creating a from address like 'Name <email@address.com>' when both are set. If
 * just 'wp_mail_from' is set, then just the email address will be used with no
 * name.
 *
 * The default content type is 'text/plain' which does not allow using HTML.
 * However, you can set the content type of the email by using the
 * 'wp_mail_content_type' filter.
 *
 * The default charset is based on the charset used on the blog. The charset can
 * be set using the 'wp_mail_charset' filter.
 *
 * @since 1.2.1
 * @uses apply_filters() Calls 'wp_mail' hook on an array of all of the parameters.
 * @uses apply_filters() Calls 'wp_mail_from' hook to get the from email address.
 * @uses apply_filters() Calls 'wp_mail_from_name' hook to get the from address name.
 * @uses apply_filters() Calls 'wp_mail_content_type' hook to get the email content type.
 * @uses apply_filters() Calls 'wp_mail_charset' hook to get the email charset
 * @uses do_action_ref_array() Calls 'phpmailer_init' hook on the reference to
 *		phpmailer object.
 * @uses PHPMailer
 *
 * @param string|array $to Array or comma-separated list of email addresses to send message.
 * @param string $subject Email subject
 * @param string $message Message contents
 * @param string|array $headers Optional. Additional headers.
 * @param string|array $attachments Optional. Files to attach.
 * @return bool Whether the email contents were sent successfully.
 */
function wp_mail( $to, $subject, $message, $headers = '', $attachments = array() ) {
	// Compact the input, apply the filters, and extract them back out
	extract( apply_filters( 'wp_mail', compact( 'to', 'subject', 'message', 'headers', 'attachments' ) ) );

	if ( !is_array($attachments) )
		$attachments = explode( "\n", str_replace( "\r\n", "\n", $attachments ) );

	global $phpmailer;

	// (Re)create it, if it's gone missing
	if ( !is_object( $phpmailer ) || !is_a( $phpmailer, 'PHPMailer' ) ) {
		require_once ABSPATH . WPINC . '/class-phpmailer.php';
		require_once ABSPATH . WPINC . '/class-smtp.php';
		$phpmailer = new PHPMailer( true );
	}

	// Headers
	if ( empty( $headers ) ) {
		$headers = array();
	} else {
		if ( !is_array( $headers ) ) {
			// Explode the headers out, so this function can take both
			// string headers and an array of headers.
			$tempheaders = explode( "\n", str_replace( "\r\n", "\n", $headers ) );
		} else {
			$tempheaders = $headers;
		}
		$headers = array();
		$cc = array();
		$bcc = array();

		// If it's actually got contents
		if ( !empty( $tempheaders ) ) {
			// Iterate through the raw headers
			foreach ( (array) $tempheaders as $header ) {
				if ( strpos($header, ':') === false ) {
					if ( false !== stripos( $header, 'boundary=' ) ) {
						$parts = preg_split('/boundary=/i', trim( $header ) );
						$boundary = trim( str_replace( array( "'", '"' ), '', $parts[1] ) );
					}
					continue;
				}
				// Explode them out
				list( $name, $content ) = explode( ':', trim( $header ), 2 );

				// Cleanup crew
				$name    = trim( $name    );
				$content = trim( $content );

				switch ( strtolower( $name ) ) {
					// Mainly for legacy -- process a From: header if it's there
					case 'from':
						if ( strpos($content, '<' ) !== false ) {
							// So... making my life hard again?
							$from_name = substr( $content, 0, strpos( $content, '<' ) - 1 );
							$from_name = str_replace( '"', '', $from_name );
							$from_name = trim( $from_name );

							$from_email = substr( $content, strpos( $content, '<' ) + 1 );
							$from_email = str_replace( '>', '', $from_email );
							$from_email = trim( $from_email );
						} else {
							$from_email = trim( $content );
						}
						break;
					case 'content-type':
						if ( strpos( $content, ';' ) !== false ) {
							list( $type, $charset ) = explode( ';', $content );
							$content_type = trim( $type );
							if ( false !== stripos( $charset, 'charset=' ) ) {
								$charset = trim( str_replace( array( 'charset=', '"' ), '', $charset ) );
							} elseif ( false !== stripos( $charset, 'boundary=' ) ) {
								$boundary = trim( str_replace( array( 'BOUNDARY=', 'boundary=', '"' ), '', $charset ) );
								$charset = '';
							}
						} else {
							$content_type = trim( $content );
						}
						break;
					case 'cc':
						$cc = array_merge( (array) $cc, explode( ',', $content ) );
						break;
					case 'bcc':
						$bcc = array_merge( (array) $bcc, explode( ',', $content ) );
						break;
					default:
						// Add it to our grand headers array
						$headers[trim( $name )] = trim( $content );
						break;
				}
			}
		}
	}

	// Empty out the values that may be set
	$phpmailer->ClearAddresses();
	$phpmailer->ClearAllRecipients();
	$phpmailer->ClearAttachments();
	$phpmailer->ClearBCCs();
	$phpmailer->ClearCCs();
	$phpmailer->ClearCustomHeaders();
	$phpmailer->ClearReplyTos();

	// From email and name
	// If we don't have a name from the input headers
	if ( !isset( $from_name ) )
		$from_name = 'WordPress';

	/* If we don't have an email from the input headers default to wordpress@$sitename
	 * Some hosts will block outgoing mail from this address if it doesn't exist but
	 * there's no easy alternative. Defaulting to admin_email might appear to be another
	 * option but some hosts may refuse to relay mail from an unknown domain. See
	 * http://trac.wordpress.org/ticket/5007.
	 */

	if ( !isset( $from_email ) ) {
		// Get the site domain and get rid of www.
		$sitename = strtolower( $_SERVER['SERVER_NAME'] );
		if ( substr( $sitename, 0, 4 ) == 'www.' ) {
			$sitename = substr( $sitename, 4 );
		}

		$from_email = 'wordpress@' . $sitename;
	}

	// Plugin authors can override the potentially troublesome default
	$phpmailer->From     = apply_filters( 'wp_mail_from'     , $from_email );
	$phpmailer->FromName = apply_filters( 'wp_mail_from_name', $from_name  );

	// Set destination addresses
	if ( !is_array( $to ) )
		$to = explode( ',', $to );

	foreach ( (array) $to as $recipient ) {
		try {
			// Break $recipient into name and address parts if in the format "Foo <bar@baz.com>"
			$recipient_name = '';
			if( preg_match( '/(.*)<(.+)>/', $recipient, $matches ) ) {
				if ( count( $matches ) == 3 ) {
					$recipient_name = $matches[1];
					$recipient = $matches[2];
				}
			}
			$phpmailer->AddAddress( $recipient, $recipient_name);
		} catch ( phpmailerException $e ) {
			continue;
		}
	}

	// Set mail's subject and body
	$phpmailer->Subject = $subject;
	$phpmailer->Body    = $message;

	// Add any CC and BCC recipients
	if ( !empty( $cc ) ) {
		foreach ( (array) $cc as $recipient ) {
			try {
				// Break $recipient into name and address parts if in the format "Foo <bar@baz.com>"
				$recipient_name = '';
				if( preg_match( '/(.*)<(.+)>/', $recipient, $matches ) ) {
					if ( count( $matches ) == 3 ) {
						$recipient_name = $matches[1];
						$recipient = $matches[2];
					}
				}
				$phpmailer->AddCc( $recipient, $recipient_name );
			} catch ( phpmailerException $e ) {
				continue;
			}
		}
	}

	if ( !empty( $bcc ) ) {
		foreach ( (array) $bcc as $recipient) {
			try {
				// Break $recipient into name and address parts if in the format "Foo <bar@baz.com>"
				$recipient_name = '';
				if( preg_match( '/(.*)<(.+)>/', $recipient, $matches ) ) {
					if ( count( $matches ) == 3 ) {
						$recipient_name = $matches[1];
						$recipient = $matches[2];
					}
				}
				$phpmailer->AddBcc( $recipient, $recipient_name );
			} catch ( phpmailerException $e ) {
				continue;
			}
		}
	}

	// Set to use PHP's mail()
	$phpmailer->IsMail();

	// Set Content-Type and charset
	// If we don't have a content-type from the input headers
	if ( !isset( $content_type ) )
		$content_type = 'text/plain';

	$content_type = apply_filters( 'wp_mail_content_type', $content_type );

	$phpmailer->ContentType = $content_type;

	// Set whether it's plaintext, depending on $content_type
	if ( 'text/html' == $content_type )
		$phpmailer->IsHTML( true );

	// If we don't have a charset from the input headers
	if ( !isset( $charset ) )
		$charset = get_bloginfo( 'charset' );

	// Set the content-type and charset
	$phpmailer->CharSet = apply_filters( 'wp_mail_charset', $charset );

	// Set custom headers
	if ( !empty( $headers ) ) {
		foreach( (array) $headers as $name => $content ) {
			$phpmailer->AddCustomHeader( sprintf( '%1$s: %2$s', $name, $content ) );
		}

		if ( false !== stripos( $content_type, 'multipart' ) && ! empty($boundary) )
			$phpmailer->AddCustomHeader( sprintf( "Content-Type: %s;\n\t boundary=\"%s\"", $content_type, $boundary ) );
	}

	if ( !empty( $attachments ) ) {
		foreach ( $attachments as $attachment ) {
			try {
				$phpmailer->AddAttachment($attachment);
			} catch ( phpmailerException $e ) {
				continue;
			}
		}
	}

	do_action_ref_array( 'phpmailer_init', array( &$phpmailer ) );

	// Send!
	try {
		return $phpmailer->Send();
	} catch ( phpmailerException $e ) {
		return false;
	}
}
endif;
就是在 WP Mail 上加一个函数,以便使用 BCMS 发邮件。
第五步:添加相关 Class
新建一个文件,命名为 Bcms.class.php,放在 wp-includes\Bcms.class.php,写入以下代码:
下载bcms.zip,解压到 wp-includes 目录下,最终处理好的文件结构为:
- wp-includes\Bcms.class.php
- wp-includes\lib\BaeBase.class.php
- wp-includes\lib\BaeException.class.php
- wp-includes\lib\BcmsException.class.php
- wp-includes\lib\RequestCore.class.php
目的是为了用 BCMS 发邮件。
第六步:添加 BCS Support 插件
在http://wordpress.org/plugins/bcs-support/下载 BCS Support 插件,添加进去。
目的是为了使用百度云存储。
第七步:添加 Sitemap 插件
- 新建 SiteMap.xsl,写入以下代码:
<?xml version="1.0" encoding="UTF-8"?>
<xsl:stylesheet version="2.0"
                xmlns:html="http://www.w3.org/TR/REC-html40"
                xmlns:sitemap="http://www.sitemaps.org/schemas/sitemap/0.9"
                xmlns:xsl="http://www.w3.org/1999/XSL/Transform">
	<xsl:output method="html" version="1.0" encoding="UTF-8" indent="yes"/>
	<xsl:template match="/">
		<html xmlns="http://www.w3.org/1999/xhtml">
			<head>
				<title>XML Sitemap</title>
				<meta http-equiv="Content-Type" content="text/html; charset=utf-8" />
				<style type="text/css">
					body {
						font-family:"Lucida Grande","Lucida Sans Unicode",Tahoma,Verdana;
						font-size:13px;
					}

					#intro {
						background-color:#CFEBF7;
						border:1px #2580B2 solid;
						padding:5px 13px 5px 13px;
						margin:10px;
					}

					#intro p {
						line-height:	16.8667px;
					}

					td {
						font-size:11px;
					}

					th {
						text-align:left;
						padding-right:30px;
						font-size:11px;
					}

					tr.high {
						background-color:whitesmoke;
					}

					#footer {
						padding:2px;
						margin:10px;
						font-size:8pt;
						color:gray;
					}

					#footer a {
						color:gray;
					}

					a {
						color:black;
					}
				</style>
			</head>
			<body>
				<h1>XML Sitemap</h1>
				<div id="intro">
					<p>
						This is a XML Sitemap which is supposed to be processed by search engines like <a href="http://www.google.com">Google</a>, <a href="http://search.msn.com">MSN Search</a> and <a href="http://www.yahoo.com">YAHOO</a>.<br />
						It was generated using the Blogging-Software <a href="http://wordpress.org/">WordPress</a> and the <a href="http://www.arnebrachhold.de/redir/sitemap-home/" title="Google Sitemap Generator Plugin for WordPress">Google Sitemap Generator Plugin</a> by <a href="http://www.arnebrachhold.de/">Arne Brachhold</a>.<br />
						You can find more information about XML sitemaps on <a href="http://sitemaps.org">sitemaps.org</a> and Google's <a href="http://code.google.com/sm_thirdparty.html">list of sitemap programs</a>.
					</p>
				</div>
				<div id="content">
					<table cellpadding="5">
						<tr style="border-bottom:1px black solid;">
							<th>URL</th>
							<th>Priority</th>
							<th>Change Frequency</th>
							<th>LastChange (GMT)</th>
						</tr>
						<xsl:variable name="lower" select="'abcdefghijklmnopqrstuvwxyz'"/>
						<xsl:variable name="upper" select="'ABCDEFGHIJKLMNOPQRSTUVWXYZ'"/>
						<xsl:for-each select="sitemap:urlset/sitemap:url">
							<tr>
								<xsl:if test="position() mod 2 != 1">
									<xsl:attribute  name="class">high</xsl:attribute>
								</xsl:if>
								<td>
									<xsl:variable name="itemURL">
										<xsl:value-of select="sitemap:loc"/>
									</xsl:variable>
									<a href="{$itemURL}">
										<xsl:value-of select="sitemap:loc"/>
									</a>
								</td>
								<td>
									<xsl:value-of select="concat(sitemap:priority*100,'%')"/>
								</td>
								<td>
									<xsl:value-of select="concat(translate(substring(sitemap:changefreq, 1, 1),concat($lower, $upper),concat($upper, $lower)),substring(sitemap:changefreq, 2))"/>
								</td>
								<td>
									<xsl:value-of select="concat(substring(sitemap:lastmod,0,11),concat(' ', substring(sitemap:lastmod,12,5)))"/>
								</td>
							</tr>
						</xsl:for-each>
					</table>
				</div>
				<div id="footer">
					Generated with Google Sitemap Generator Plugin for WordPress by Arne Brachhold. BAE edition Modified by <a href="http://blog.gimhoy.com/" target="_blank">Gimhoy</a>. This XSLT template is released under GPL.
				</div>
			</body>
		</html>
	</xsl:template>
</xsl:stylesheet>
- 新建 Sitemap.php,写入以下代码:
<?php
include 'includes/connection.php';
require('./wp-blog-header.php');
header("Content-type: text/xml");
header('HTTP/1.1 200 OK');
$posts_to_show = 1000; // 获取文章数量
echo '<?xml version="1.0" encoding="UTF-8"?>';
echo '<?xml-stylesheet type="text/xsl" href="/sitemap.xsl"?>'; // XSL地址
echo '<urlset xmlns:xsi="http://www.w3.org/2001/XMLSchema-instance" xsi:schemaLocation="http://www.sitemaps.org/schemas/sitemap/0.9 http://www.sitemaps.org/schemas/sitemap/0.9/sitemap.xsd" xmlns="http://www.sitemaps.org/schemas/sitemap/0.9">';
?>
<!-- generated-on=<?php echo get_lastpostdate('blog'); ?> Modified Gimhoy(http://blog.gimhoy.com)-->
  <url>
      <loc><?php echo get_home_url(); ?></loc>
      <lastmod><?php $ltime = get_lastpostmodified(GMT);$ltime = gmdate('Y-m-d\TH:i:s+00:00', strtotime($ltime)); echo $ltime; ?></lastmod>
      <changefreq>daily</changefreq>
      <priority>1.0</priority>
  </url>
<?php
header("Content-type: text/xml");
$myposts = get_posts( "numberposts=" . $posts_to_show );
foreach( $myposts as $post ) { ?>
  <url>
      <loc><?php the_permalink(); ?></loc>
      <lastmod><?php the_time('c') ?></lastmod>
      <changefreq>monthly</changefreq>
      <priority>0.6</priority>
  </url>
<?php } // end foreach ?>
</urlset>
第八步:WordPress 伪静态
修改 App.Conf,用以下代码覆盖:
handlers:
  - url : /
    script: index.php
  - url : /sitemap.xml$
    script : /sitemap.php
  - url : (.*)\.zip$
    script : $1.zip
  - url : (.*)\.txt$
    script : $1.txt
  - url : (.*)\.xsl$
    script : $1.xsl
  - url : (.*)\.css$
    script : $1.css
  - url : (.*)\.js$
    script : $1.js
  - url : (.*)\.jpg$
    script : $1.jpg
  - url : (.*)\.gif$
    script : $1.gif
  - url : (.*)\.png$
    script : $1.png
  - url : (.*)\.jpeg$
    script : $1.jpeg
  - url : (.*)\.php$
    script : $1.php
  - url : /wp\-admin/
    script : /wp-admin/index.php
  - url : /wp\-includes/(.*)
    script : /wp-includes/$1
  - url : /wp\-content/(.*)
    script : /wp-content/$1
  - url : (.*)
    script : /index.php

  - expire : .jpg modify 10 years
  - expire : .swf modify 10 years
  - expire : .png modify 10 years
  - expire : .gif modify 10 years
  - expire : .JPG modify 10 years
  - expire : .ico modify 10 years
  - expire : .txt modify 10 years
  - expire : .xsl modify 10 years
第九步:上传,然后像平时安装 WordPress 一样安装
大功告成!